


There’s something incredibly rewarding about restoring classic Tamiya models to their former glory. In this guide, I will walk you through the entire process, sharing insights from my own experiences and practical tips to make your restoration journey enjoyable and successful. Whether you’re a longtime enthusiast or a newcomer, I’ll help you navigate each step, from gathering materials to finishing touches. Together, we can breathe new life into your cherished Tamiya collection!
Types of Classic Tamiya Models
While exploring the different types of classic Tamiya models, you’ll find a diverse range of categories that cater to various collectors and hobbyists. These models can be broken down into:
| RC Cars | Remote control vehicles designed for high-speed racing and maneuverability. |
| Static Kits | Models that are meant for display and assembly without moving parts. |
| Military Vehicles | Models reflecting real-world military equipment and machinery. |
| Motorcycles | Scaled replicas of iconic motorcycles. |
| Commercial Vehicles | Model representations of trucks, buses, and other commercial vehicles. |
Perceiving the nuances of each type can enhance your restoration experience. For a comprehensive understanding of model restoration, you can check out Diecast Car Restoration: A Step-by-Step Guide.
RC Cars
You can look into the world of RC cars, which are specifically designed for remote control operation. These models come in various shapes and sizes, often featuring detailed designs that replicate real-life vehicles. They are perfect for racing enthusiasts and hobbyists looking to customize their rides, often allowing modifications for enhanced performance.
Static Kits
With static kits, you have the chance to build displays of intricate designs without the mechanics of moving parts. These kits focus on craftsmanship and assembly, perfect for those who appreciate the artistry of model-making.
For instance, static kits often include detailed instructions and components that reflect historical accuracy, allowing you to recreate iconic vehicles or machinery. Whether you’re interested in military tanks, vintage cars, or aircraft, these kits provide a fulfilling restoration experience for those who love to showcase their hard work.
Factors to Consider Before Restoration
It’s vital to evaluate various factors before submerging into your restoration project. Consider the model’s rarity, your skill level, and the extent of restoration needed. A thorough assessment can help you prepare for the undertaking. Here are some factors to keep in mind:
- Model condition
- Complexity of the restoration
- Cost of supplies
- Time commitment
- Personal attachment to the model
Knowing these elements will set you up for a successful restoration. For more insights, check out 1:24 Tamiya model restoration… some tips! – Page 1.
Condition of the Model
For effective restoration, evaluate the model’s condition thoroughly. Look for structural damage, missing parts, and the state of the paint and decals. Assessing these elements will help you determine the extent of work required to bring your classic Tamiya model back to life.
Availability of Replacement Parts
If your model requires specific parts, check their availability before starting your project. It’s vital to research if aftermarket or original parts are accessible. This information can significantly affect the restoration process’s success.
With many Tamiya models, certain parts can be harder to come by, especially for vintage kits. Utilizing resources like online forums, social media groups, and specialized retailers can help you source what you need. When parts are hard to find, you may have to get creative with repairs or modifications, which can add to the personalization of your restored model.

Step-by-Step Restoration Process
Assuming you have your classic Tamiya model ready for restoration, it is vital to follow a structured process to achieve outstanding results. I recommend visiting Tamiya Egress – The Restoration of a Classic RC Car for additional insights. This guide breaks the process down into manageable steps, ensuring a thorough and effective approach to breathing new life into your vintage model.
Restoration Steps
| Disassembly and Inspection | Assess the condition of your model and identify parts to repair or replace. |
| Cleaning and Repair | Thoroughly clean all components and execute necessary repairs. |
| Reassembly and Finishing Touches | Put your model back together and add any final touches. |
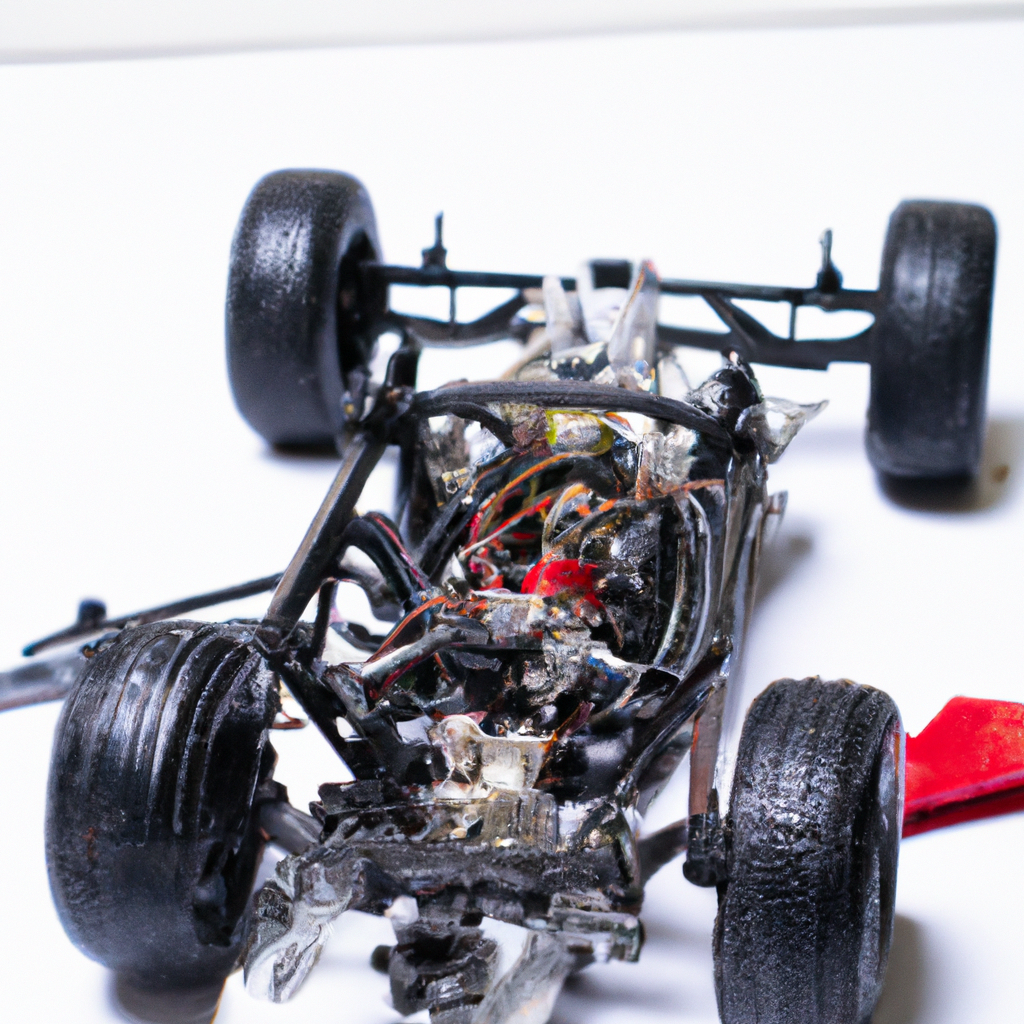
Disassembly and Inspection
Inspection of your model is the first step in restoration. I begin by carefully disassembling each part while taking notes or photos to ensure accurate reassembly later. This inspection phase allows me to assess the overall condition, noting any damages or worn components that require repair or replacement.
Cleaning and Repair
StepbyStep, I move into the cleaning and repair phase where I meticulously clean each component. I use appropriate cleaning agents to remove dirt and grime, then inspect parts for any wear or breakage that might need fixing. You may need to replace broken gears or plastic components to restore functionality.
It is also during this stage that I address any necessary repairs. If the chassis has cracks or if suspension components show wear, I make repairs using glue for plastics or replacement parts sourced online. This is when I can ensure that everything is in perfect condition before proceeding to reassembly.
Reassembly and Finishing Touches
Assuming all parts are cleaned and repaired, I can now begin the reassembly process. I carefully reassemble the model, referencing my earlier notes and photos to ensure everything is accurately placed. Each step is approached with patience to avoid mistakes.
Repairing your model is not simply about putting it back together; it includes adding those final touches that enhance its classic charm. I often apply new decals or touch up paint on any scuffed areas, ensuring that the model looks as close to new as possible. The attention to these details results in a stunning restored classic ready for display or use!
Tips for Successful Restoration
For a successful restoration, I recommend following a few key strategies:
- Plan your restoration before starting.
- Document the original state of the model.
- Work in a clean, organized environment.
- Be patient and take your time.
- Join online forums for community support.
The right approach can make all the difference in achieving a great result.
Tools and Materials Needed
To efficiently restore your classic Tamiya model, you’ll need some important tools and materials. A good set of screwdrivers, a precise hobby knife, sandpaper of various grits, and a reliable paintbrush are fundamental. Additionally, having plastic glue, spray paint, and masking tape on hand will allow you to achieve a clean and professional finish.
Techniques for Painting and Detailing
Even the best restoration can fall flat without proper painting and detailing techniques. Start by ensuring the surface is clean and properly primed. Apply paint in thin, even layers, allowing ample drying time between coats to prevent runs. Consider using airbrush techniques for a smooth finish and finer details. Don’t forget to add decals and weathering effects to enhance realism.
With these techniques in mind, I focus on achieving the best results in painting and detailing. I start by selecting the right type of paint that is appropriate for plastic models, ensuring long-lasting durability. Using masking tape can help create sharp lines for multi-colored designs. You’ll also want to practice patience during drying times, allowing each layer to set properly. Finally, a good sealant can protect your paint job and enhance the overall appearance of your restored model.
Pros and Cons of Restoring Classic Models
Unlike modern kits, restoring classic Tamiya models offers unique challenges and rewards. The process can be fulfilling but also comes with its own set of difficulties that I had to navigate. Below is a breakdown of the pros and cons to help you decide if restoration is right for you.
| Pros | Cons |
|---|---|
| Enhances value of the model | Time-consuming process |
| Pleasurable and rewarding experience | Need for specialized tools |
| Opportunity for learning | May require sourcing rare parts |
| Increases knowledge of model history | Potential for unexpected issues |
| Strengthens nostalgic connections | Can be costly with specialized products |
Benefits of Restoration
Assuming you choose to restore a classic Tamiya model, you’ll find that this journey can lead to deeper appreciation for the craftsmanship behind these kits. Not only does restoration revive the aesthetics and functionality of the model, but it also fosters a connection to its history. Additionally, you will gain valuable skills along the way, enriching your self-confidence in model building.
Potential Challenges
On the other hand, restoration can present some obstacles I faced during the process. It often requires significant time and patience, especially when dealing with intricate parts that may not fit perfectly or are difficult to assemble.
Restoration can indeed become quite complex, especially when you run into rare or discontinued components which may take considerable effort to source. You might find yourself needing specialized tools or techniques, which can be an added expense. Additionally, issues such as deterioration of original materials or unforeseen complications can crop up, making it important that you are well-prepared and patient throughout the journey of restoration.
Common Mistakes to Avoid
All enthusiasts encounter pitfalls during their restoration journey, and I want to help you sidestep these errors. One common mistake is rushing through the disassembly; taking your time ensures you preserve the integrity of parts. Another oversight is using the wrong paint type—always opt for acrylic or enamel specifically designed for plastic models. Additionally, neglecting to clean components before reassembly can lead to adhesion issues. I’ve learned that organizing small parts and screws in labeled containers makes reassembly much simpler and prevents losing pieces. Avoiding these mistakes will enhance your restoration experience.
Conclusion
Drawing together all the insights from this step-by-step guide, you can approach the restoration of classic Tamiya models with confidence. I hope that you now feel equipped to tackle each phase of the restoration process, from cleaning and repairing to painting and detailing. Your patience and dedication will not only breathe new life into these beloved models but also provide a rewarding experience as you celebrate their history and craftsmanship. Enjoy the journey of restoration, and cherish the joy these classic models bring to your collection.